 by Bobbi Maiers
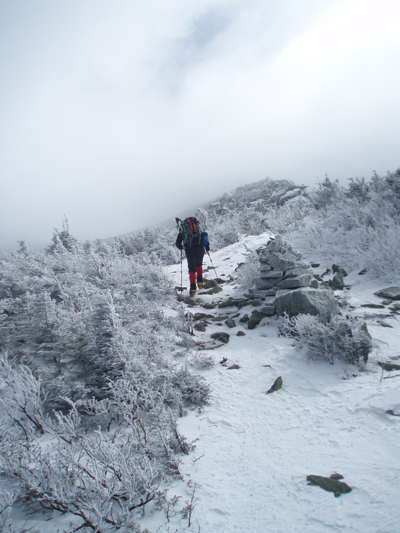
Your favorite peaks, like New Hampshire's Mount Adams, are open year-round, with proper planning and gear. (Photo: Dave MacLeay)
Hiking is a year-round activity, yet many hikers call it quits once the trees shed their leaves and spend their winter months indoors, awaiting spring. But winter hiking holds a beauty all its own, along with a level of exhilaration you can't find on the trail in the midst of a sweltering summer. The world takes on a different shape under a blanket of fresh snow. Cold temperatures sharpen senses, and chilly air makes those uphill climbs far more invigorating.
With careful pre-hike planning, the proper gear, a hearty spirit, and a warm drink waiting for you at trail's end, a snowy hike is a picturesque, satisfying way to experience the benefits of a season we tend to take for granted.
Cool and dry
Many who fear frigid temps think only of how cold it feels when they peek their head out the door in the morning — not how it'll feel when they're warmed up, carrying a bit of weight up a steep slope. The real concern on a winter hike is moderating your temperature and staying cool (and dry) while you're moving.
If you over-bundle when you're stationary, you'll overheat on the trail, creating a sweat/freeze cycle that puts cold, damp fabrics next to your skin. In the short run you'll feel clammy and uncomfortable; in the long run you could succumb to hypothermia.
In winter it's important to anticipate when you will warm up or cool down and shed and add layers as needed. If you feel yourself getting hot and sweaty or uncomfortably cold, don't wait. Stop and adjust your layers right away.
What you wear for those layers will depend on multiple factors like temperature, humidity, altitude, activity level, and your own thermostat and comfort level. But, an enjoyable winter jaunt is within any hiker's reach, it just requires dressing smart from head to toe — controlling moisture and cooling your body's tendency to overheat from exertion.
Feet first
“If your feet are cold, you're finished,” says Cathy Anderson-Meyers, a veteran snowshoe guide and REI Outdoor School instructor based near Tahoe National Forest. Having led snowshoe trips for the past 18 years, Anderson-Meyers knows that protecting your feet is paramount in winter, particularly choosing the insulating layer between your boots and skin.
Socks
Your feet are taking you into the backcountry and getting you back out, so they need to be in great shape whether your trip is five hours or five days. Leave your cotton hosiery at home and choose from the following fibers:

Classic rag wool: Some hikers prefer this old-school option (about 80% wool, 20% spandex, depending on the brand) because wool breathes well and insulates when wet. You'll want liner socks made from polyester, silk, or polypropylene to wick sweat and keep the wool from rubbing.
Synthetic blend: Take your pick from a rainbow of polyester, nylon, Spandex, acrylic, and/or polypropylene styles in a variety of thicknesses and heights. Some brands incorporate extra padding to cushion the heel and ball of your foot.
Wool blend: Merino wool is most often combined with nylon and some elastic for non-itchy, moisture-wicking comfort. Often they're the most costly option, but a good pair of socks can last years with proper care, so it's worth the extra bucks to get a thick, calf-high pair if you're heading out into serious cold.
Waterproof: A few companies manufacture waterproof socks made with neoprene, Gore-Tex, or a combination of nylon, polyester, and spandex. They are expensive and can be bulky; a good waterproof boot should make these socks unnecessary, though they could have a place in extreme cold.
Make sure your socks allow plenty of toe-wiggle room, and remember to pack an extra pair. You won't want to wear a soggy pair to bed if you're out overnight; yours may get dirty (more than the usual trail dirt); you might even lose your gloves and need to improvise. Extras always comes in handy.
Boots
Boots are your solid, sturdy barrier from ice, melting snow, and any other freezing things you don't want your toes to touch. Many people chose trail runners or low, sturdy trail shoes for summer hiking, but higher boots are a must for a winter walk. A waterproof pair is ideal, and many pairs have a breathable membrane like Gore-Tex or eVent. Dedicated, insulated winter boots and Pac boots are another option, but not a requirement.

When boot shopping, be sure to wear your winter hiking socks and your preferred insoles when trying on different models. Then tramp around in the store as much as you need to get a good feel for them. Waterproof material means a bulkier boot, so make sure the toe box is roomy and consider going up a half-size if that's more comfortable, but avoid going too large and getting heel slop. The heavier boot might seem clunky in the store, but you'll be grateful for its sturdy warmth on the trail.
If you'll be doing serious winter hiking and mountaineering, you'll want double plastic or leather mountaineering boots. However, sturdy, waterproof hiking and backpacking boots will be adequate for snowshoeing and less technical hikes.
Gaiters
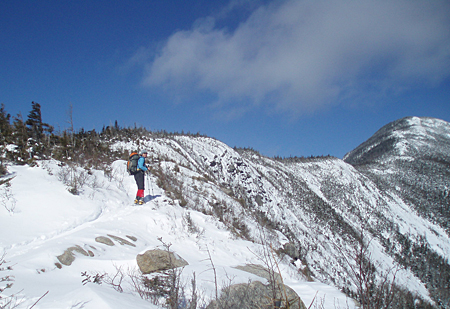
 You'll want snowshoes for snow more than 6 inches deep, but they aren't a requirement for all winter hiking, depending on terrain and trail conditions. (Photo: Tom Mangan)

You'll need a pair of these durable, waterproof nylon sheaths if you're tromping through snow that's at least calf-deep. Gaiters provide an extra layer of warmth and wind protection in addition to keeping your lower legs dry. Ankle-high gaiters are useful for very small amounts of snow; the knee-highs are a wiser buy. Better to have one pair that works in all snowy circumstances than to carry two pairs on the trail. And you can use gaiters year-round — they also keep out summer dust and spring or fall mud.
Like socks, make sure your gaiters fit with the footwear you'll be using, especially if you'll be wearing larger insulated boots or mountaineering boots.

Snowshoes
Forget the rawhide-webbed antiques. Today's snowshoes are smaller, sleek collections of aluminum, nylon, and steel. Find out beforehand if you'll be traveling through deep snow, since snowshoes are bulky and not something you want to pack along just in case (though many are light enough that you can). If you're unsure of trail conditions, bring them along and avoid post-holing. Post-holing makes for very difficult hiking as your feet plunge through the upper layer of snow, and it ruins the trail for hikers who come after you.
What size snowshoes you'll need will depend on your complete weight (you plus your gear) and the type of snow you'll navigate (packed trails versus deep powder). Make sure your snowshoe bindings are adjustable with gloves on, comfortable with your preferred footwear, and provide adequate traction for your hikes. Heel lifts are very helpful on steeper ascents.
Poles
From her years of snowshoeing experience, Anderson-Meyers recommends using poles even if you're not carrying a pack. “They give you great maneuverability and come in handy if you step on yourself or fall in a hole,” she said.
Get fitted for poles at your local outdoor shop and learn to adjust and use them to their full advantage — telescoping models can be shortened to help you climb and lengthened for descending steep inclines, alleviating knee pressure. Try adjusting different models with your gloves on before buying. Your poles should have snow baskets. Most manufacturers sell basket accessories that fit on their poles.
Traction tools

On snow-packed or icy trails, some hikers prefer traction devices, which can help solidify your footing. Teresa Taylor, a longtime hiker and alpine trail runner who makes her home at a snowy 10,200 feet in Colorado, says a pair of heavy-duty metal spikes offer the best traction. “Here in Colorado, the trail's rocky and it eats up Yaktrax,” she said. “Kahtoola Microspikes are all chain on the bottom, and they stay on the boot and don't slide.”
Strap-on, flexible crampons can be used for steeper, icier hikes, but leave the semi-rigid models for ice climbing and technical mountaineering. If you'll be packing along crampons, be sure you have a boot with a rigid enough sole that accepts them. Pac boots and other highly flexible boots can be warm and useful for snowshoeing, but may not work well with your crampons.
Learning to layer
Cold weather adventures are about adaptation. Dressing in layers allows you to peel one or add one — easy, quick adjustments you can make when you're climbing a hill, taking a break, or settling into camp. Three light layers that allow you to move easily can be a better option than just one bulky, down-filled jacket, though you may want to bring that along for insulation during rest stops or if you'll be staying out overnight.
And above all, there's one simple winter hiking rule, no matter how short the trip: avoid cotton.
“Cotton kills,” said Taylor, who performed 25 rescues for people lost on Colorado's Pikes Peak last year alone. “We get people going up and see jeans frozen to them — no wonder you're cold. Jeans and flannel shirts are nice if you're a lumberjack, but if you're climbing a mountain in flannel, a cotton T-shirt, and jeans, you're done for.”
Cotton is slow to dry and stops insulating when it gets wet. “I always, always say that your first layer needs to be wicking material," Anderson-Meyers says, "and you layer on out from there.”
Base layer
Like Grandpa's long johns, your base layer should be the first thing you put on after your skivvies. But unlike Grandpa's one-piece cotton getup, today's base layers are made from superior fabrics designed to do three things: insulate, wick moisture, and dry quickly.

Most base layers are rated from minimum to maximum warmth, and each brand has its own terms and rating system. For instance, REI ratings are light, mid, or heavyweight, while Patagonia has four base-layer classifications going from the lightest material (Capilene 1) to Everest-grade warmth (Capilene 4).
Whatever the brand or catchphrase (Capilene, Thinsulate, etc.), your base layer should be polyester with some lycra, a wool/polyester blend, or Merino wool. Silk is available, but typically only for lightweight layering. Base layers may seem costly, but the good ones last long enough to justify the investment. For instance, I've had my favorite Patagonia base layer set since 1999, when I spent several months living in a tent in Alaska. Ten years of cold-weather adventures later, it's still the first thing I put on. Just make sure you really like the color.
A note about skivvies: ditch the cotton panties and briefs and opt for sweat-wicking fabrics. Know that no matter how well they wick, you still might feel wetness — particularly women. “Sports bras hold moisture under your breasts, so it stays cold around your core,” Taylor said. “I don't think a lot of women realize that.” Carry an extra sports bra and remove your damp one if you're stopping for a prolonged rest or making camp for the night.
Insulating and mid layers

As you dress, keep mobility, layers, and insulation in mind. You'll need far less insulation for very short, active hikes and snowshoes in mild temperatures, than you will on extended treks above treeline. In the first case, you can avoid overly large or bulky clothing, which would become a nuisance on your body or in your pack.
Fleece is a good mid-layer because it's lightweight, breathable, and retains heat well. A zip-up style is nice for added breathability. If you need another interior layer, a vest to warm your core works nicely. For your bottom half, Lycra tights will work over a base layer and allow for easy movement. If you tend to run cold, will be taking breaks, or just aren't sure if you'll be warm enough, consider bringing along extra or heavier mid layers.
If you'll be out above treeline, in very cold conditions, and/or for extended periods, you'll want—and need—far more insulation while you hike, but particularly during rest stops when you'll find yourself cooling off quickly. Depending on conditions, an insulated down or synthetic "sweater" or jacket and heavy fleece or insulated pants will provide proper insulation. Many hikers and backpackers prefer down over synthetic fill, because it packs down smaller than synthetics and provides more warmth per weight than other insulation, though it is more expensive. Down garments are sold in different weights for a range of temperatures and activity levels.

Outer layer
A shell jacket and pants are a necessity, and both should be water- and windproof. Both your outer jacket and pants should be large enough to accommodate all of your winter layers. Some hikers size up their winter shells, to allow adequate space for heavy fleece and/or down insulation. Nicely designed top layers will have adjustable wrists and ankles so you can block cold air seepage.
Always opt for a jacket with a hood; a visor shape to the hood will keep rain and snow from falling on your forehead. If you will be wearing a helmet, for skiing or climbing, get a helmet-compatible hood. Under-arm zipper vents are helpful for cooling down during hard climbs.
Head protection

Don't go for the cute hat that matches your jacket. For winter excursions, take the comfortable one that fully covers your ears and doesn't itch. Some hikers prefer to hike with a thin hat, then layer a heavier fleece one over the first when things cool off. Ponytailed folks can seek a hat with a pony hole to avoid feeling that weird lump at the back of your neck. Avoid scarves; they can be a bulky nuisance.
If you want more coverage than a hat and hood, go for a balaclava, which will seal in warmth. Choose one with an interior mask that you can pull up around your nose. Some balaclavas use a heavier material for more sensitive facial areas, and some have small ear openings so you don't have to strain to hear your hiking companions. Most are some combo of nylon, polyester, and Lycra; fleece is a good option if you plan to sleep in it. Remember — if you're too hot on the trail, vent your jacket or peel off a layer. Don't ditch your head covering.
Snow and ice reflect a lot of UV rays, and can even cause snow blindness, so sunglasses are necessary year-round. For larger groups or longer trips, consider bringing along an extra pair.

And if you're dealing with seriously frigid wind or temperatures, particularly above treeline, adding goggles will give you complete facial coverage.
Hand protection
You can layer hands just like the rest of your body. A thin liner or fleece glove with a waterproof overmitt or glove, allows for adjustments. Avoid big, bulky gloves or mittens that will consume too much pocket and pack space. Some people prefer open-finger gloves with a mitten that pulls over, so you can use your digits when you need them. Make sure hand coverings aren't too tight. Like socks, pack along extras that are just as warm as the originals.
Food and drink

In winter you may not see your perspiration, but you still need to hydrate regularly. If you're using a hydration bladder, keep your hose from freezing up with an insulator kit, which comes with a bite-valve cover and a foam/thermoplastic tube cover (many winter packs come with a hose insulator). If you don't want to purchase a kit, find a way to run your hose inside your top two layers, close enough to your body warmth that it won't freeze. Also, blow the water out of your hose every time after you drink so none of it freezes and blocks flow.
For water bottles, Anderson-Meyers recommends using the kind with a pullout tip and storing them upside down in an insulated sleeve to keep the tips from freezing. Hot beverages are nice, and energy drinks offer an electrolyte boost, but plain old water is still essential.
Don't forget to eat frequently too. You'll need more calories in winter and food helps keep you warm. Eat often and pack foods rich in protein and complex carbs. Good cold-hiking food options include cheese and crackers, peanut butter, Honey Stinger gel packets you can spread on a peanut butter sandwich, beef jerky, and a mix of nuts and dried cranberries and apricots, says Anderson-Meyers.
Sleeping tips
Once you're comfortable with winter hiking and snowshoeing, you can move on to winter camping and backpacking and extend your snowy stay. Here are a few suggestions to get you started.
Bag liners: Can't sleep if your feet are cold? Good thing you've brought those extra socks. Cold sleeper in general? Invest in a bag liner for your heaviest sleeping bag. Sweaty sleeper? Rely on your clothing and basic winter bag. Know your own cold tolerances, experiment in safe conditions (like your backyard), and plan accordingly.

Your standard three-season bag won't cut it for nighttime winter temps. Most bags in the cold weather category are suitable for a range from zero to minus-20 degrees. You can find the minus-40s too, but they're spendy and probably unnecessary unless you're planning an extended alpine stay. Prices vary greatly depending on whether you want down or synthetic insulation.
Down is lighter, more expensive, and packs smaller, while synthetic bags are a bit heavier, bulkier and generally cost a bit less. The most versatile option might be a standard zero-degree bag with a liner you can add if necessary. Visit your favorite outdoor shop to test out several bags, and once you've made your choice, head out for a one-night test run before tackling a longer outing.

Bag liners can accomplish a lot — you may not need to run out and purchase a new $350 down bag if a liner can add eight to 10 degrees of warmth to your current bag. Liners come in silk, polyester, or light- to mid-weight fleece, ranging from about $40 to $65. Avoid cotton “travel sheets” that provide only about five degrees of extra warmth.
A liner also comes in handy on vacation if you bed down in a less-than-spotless hostel or hotel. And if a new liner seems too costly, just measure yourself, head to the local craft shop, and scout out some nice microfleece. Sew a couple edges together and you've made your own liner. (If you haven't touched a needle and thread since junior high home ec, request a crafty companion's help.)
Sleeping Pad: Your winter sleeping bag set-up won't keep you warm without proper insulation from the cold, snowy ground. Get a winter sleeping pad with a higher R-value. Many winter campers double up and use two pads on top of one another.
Bandanas: Appalachian Trail thru-hiker Jeffrey Hunter says one of his favorite discoveries was a 24-hour use for his bandana. “I put it over my mouth when I sleep,” he said. “When you're sleeping in freezing weather, you lose a lot of moisture through your breath. A bandana will dampen that effect.” Or keep your balaclava on while you sleep, especially if it has an interior mask that can be pulled over your nose. Buff makes a lightweight wool version of its headgear, as well as fleece models.
Warmers: Another helpful discovery that Taylor made from years of prolonged winter on the mountainside is the creative use of hand warmers. “If you put them in your pants pocket and your pockets go over your femoral artery near your groin, it will help a lot,” she said. “It warms the blood, not just your palm.” A couple hand warmers in your pockets would help warm up any chilly sleeping bag.
Winter hiking is well worth the extra gear, preparation, and care. (Photo: Dave MacLeay)
Why the cold?
Whatever extra time and gear it takes to hit the winter trail safely and comfortably, you'll discover why it's worth it once you're out there among the smell of fresh pine and tree branches decorated with pristine white powder. Cold temperatures are invigorating in a way that sweaty summer hikes can never be.
“The woods are so insulated and quiet and peaceful and beautiful,” said Taylor. “It's the magic of winter.” The right planning, tools, and care can take you there — just don't forget that extra pair of socks.
Some winter hiking tips
- Be prepared: Check trail conditions and the weather forecast before you head out. Winter weather can leave you with a smaller margin for error.
- Tell someone where you're going and when to expect you back.
- Allot more time to cover shorter distances than on three-season hikes. Be conservative and work your way up.
- Use the clothing and gear that works for you. Other experienced winter hikers and backpackers can give valuable advice, but what will work for you is individual and not identical to your hiking partner. Everyone has her or his own internal thermostat.
- If you're unsure of what to bring, pack the extra layers. You're far less likely to rue the extra jacket versus the absent one. On your hike, note what worked in what conditions and what you wish you had or hadn't brought along.
- Carry some form of emergency shelter.
- Put on that puffy jacket, extra fleece hat, overmitts, or other layers as soon as you stop for a snack or lunch break, and retain the heat you already generated while hiking.
- Cover exposed skin in extreme cold and wind. Frostbite and frostnip occur when skin becomes frozen; hands, nose, feet, ears, and toes are common sites. Signs and symptoms include coldness, firmness, stinging, burning, numbness, clumsiness, pain, throbbing, excessive sweating, and skin discoloration.
- If someone in your group starts exhibiting the "umbles" — stumbles, mumbles, fumbles, and grumbles — they're showing signs of hypothermia, a very serious conditions. Get him or her warm and dry, give them food and drink, get them moving toward safety, and seek medical attention, if necessary.
- Consider taking a winter mountaineering course. You will learn how to travel safely in winter, use an ice axe for self arrest, and be aware of avalanche terrain (you don't need to be a backcountry skier or climber to end up in avalanche terrain), among other skills.
Got your own cold weather hiking tips? Share them below.


